Wednesday, November 20, 2024

The Ultimate Guide to Floating Shelves for Beginners

The Ultimate Guide to Floating Shelves for Beginners

The Ultimate Guide to Floating Shelves for Beginners

Floating shelves, with their sleek, minimalist aesthetic and space-saving design, have become a popular choice for home décor enthusiasts. They offer a versatile and stylish way to showcase your belongings, from books and plants to decorative objects and treasured mementos. This comprehensive guide will equip you with the knowledge and understanding you need to successfully install and utilize floating shelves in your home, whether you're a seasoned DIYer or a first-timer.

Understanding the Benefits of Floating Shelves

Floating shelves offer a multitude of advantages over traditional shelves, making them a compelling choice for modern home design:

Space-Saving Design

Eliminating the need for bulky brackets or legs, floating shelves create a clean and uncluttered look, maximizing the use of vertical space. This is particularly beneficial in smaller rooms or areas where floor space is limited.

Aesthetic Appeal

Floating shelves seamlessly integrate with any style of décor, adding a touch of modern elegance and sophistication. Their minimalist design allows your belongings to take center stage, enhancing the overall visual appeal of your room.

Versatility

Floating shelves are incredibly versatile and can be used in various rooms throughout your home. From showcasing books in your living room to displaying plants in your bedroom, the possibilities are endless.

Easy Installation

While the installation process may seem intimidating at first, floating shelves are relatively straightforward to install, requiring minimal tools and effort. With the right guidance and a little patience, even beginners can achieve professional-looking results.

Types of Floating Shelves

Floating shelves come in a wide array of materials, sizes, and styles, catering to diverse tastes and preferences.

Materials

  • Wood: A classic and timeless choice, wooden floating shelves offer natural warmth and versatility. They come in various finishes, from rustic to modern, allowing for easy integration with any style.
  • Metal: Metal floating shelves, often crafted from steel or aluminum, offer a contemporary and industrial aesthetic. Their sleek and minimalist design complements modern décor styles.
  • Glass: Glass floating shelves provide a sleek and airy look, perfect for creating a sense of spaciousness. They are often used to showcase delicate items or artwork.
  • Acrylic: Acrylic floating shelves offer a clear and transparent appearance, allowing them to blend seamlessly with their surroundings. They are an excellent choice for displaying smaller items or showcasing unique objects.
  • Sizes and Shapes

    Floating shelves are available in various sizes and shapes, allowing for flexibility in customization. Consider the following factors when selecting the size:

  • The size of the items you plan to display: Ensure that the shelf is large enough to accommodate your belongings comfortably.
  • The available space: Measure the wall space where you plan to install the shelves and choose a size that fits proportionally.
  • The overall design aesthetic: Consider the overall design of your room and choose a size and shape that complements the existing furniture and décor.
  • Styles

    From classic and traditional to modern and contemporary, floating shelves are available in a wide range of styles to complement any décor. Consider the following stylistic considerations:

  • Color: Choose a color that complements the existing color palette of your room.
  • Finish: Select a finish that aligns with the overall aesthetic of your room, such as natural wood, stained wood, or a polished metal finish.
  • Shape: Rectangular shelves are the most common, but you can also find shelves in unique shapes like curved or angled designs.
  • Installing Floating Shelves

    Installing floating shelves is a relatively straightforward process that can be completed by most DIY enthusiasts. Here's a step-by-step guide:

    1. Choose the Location

    Carefully select the location for your floating shelves, taking into account the weight of the items you plan to display and ensuring adequate support.
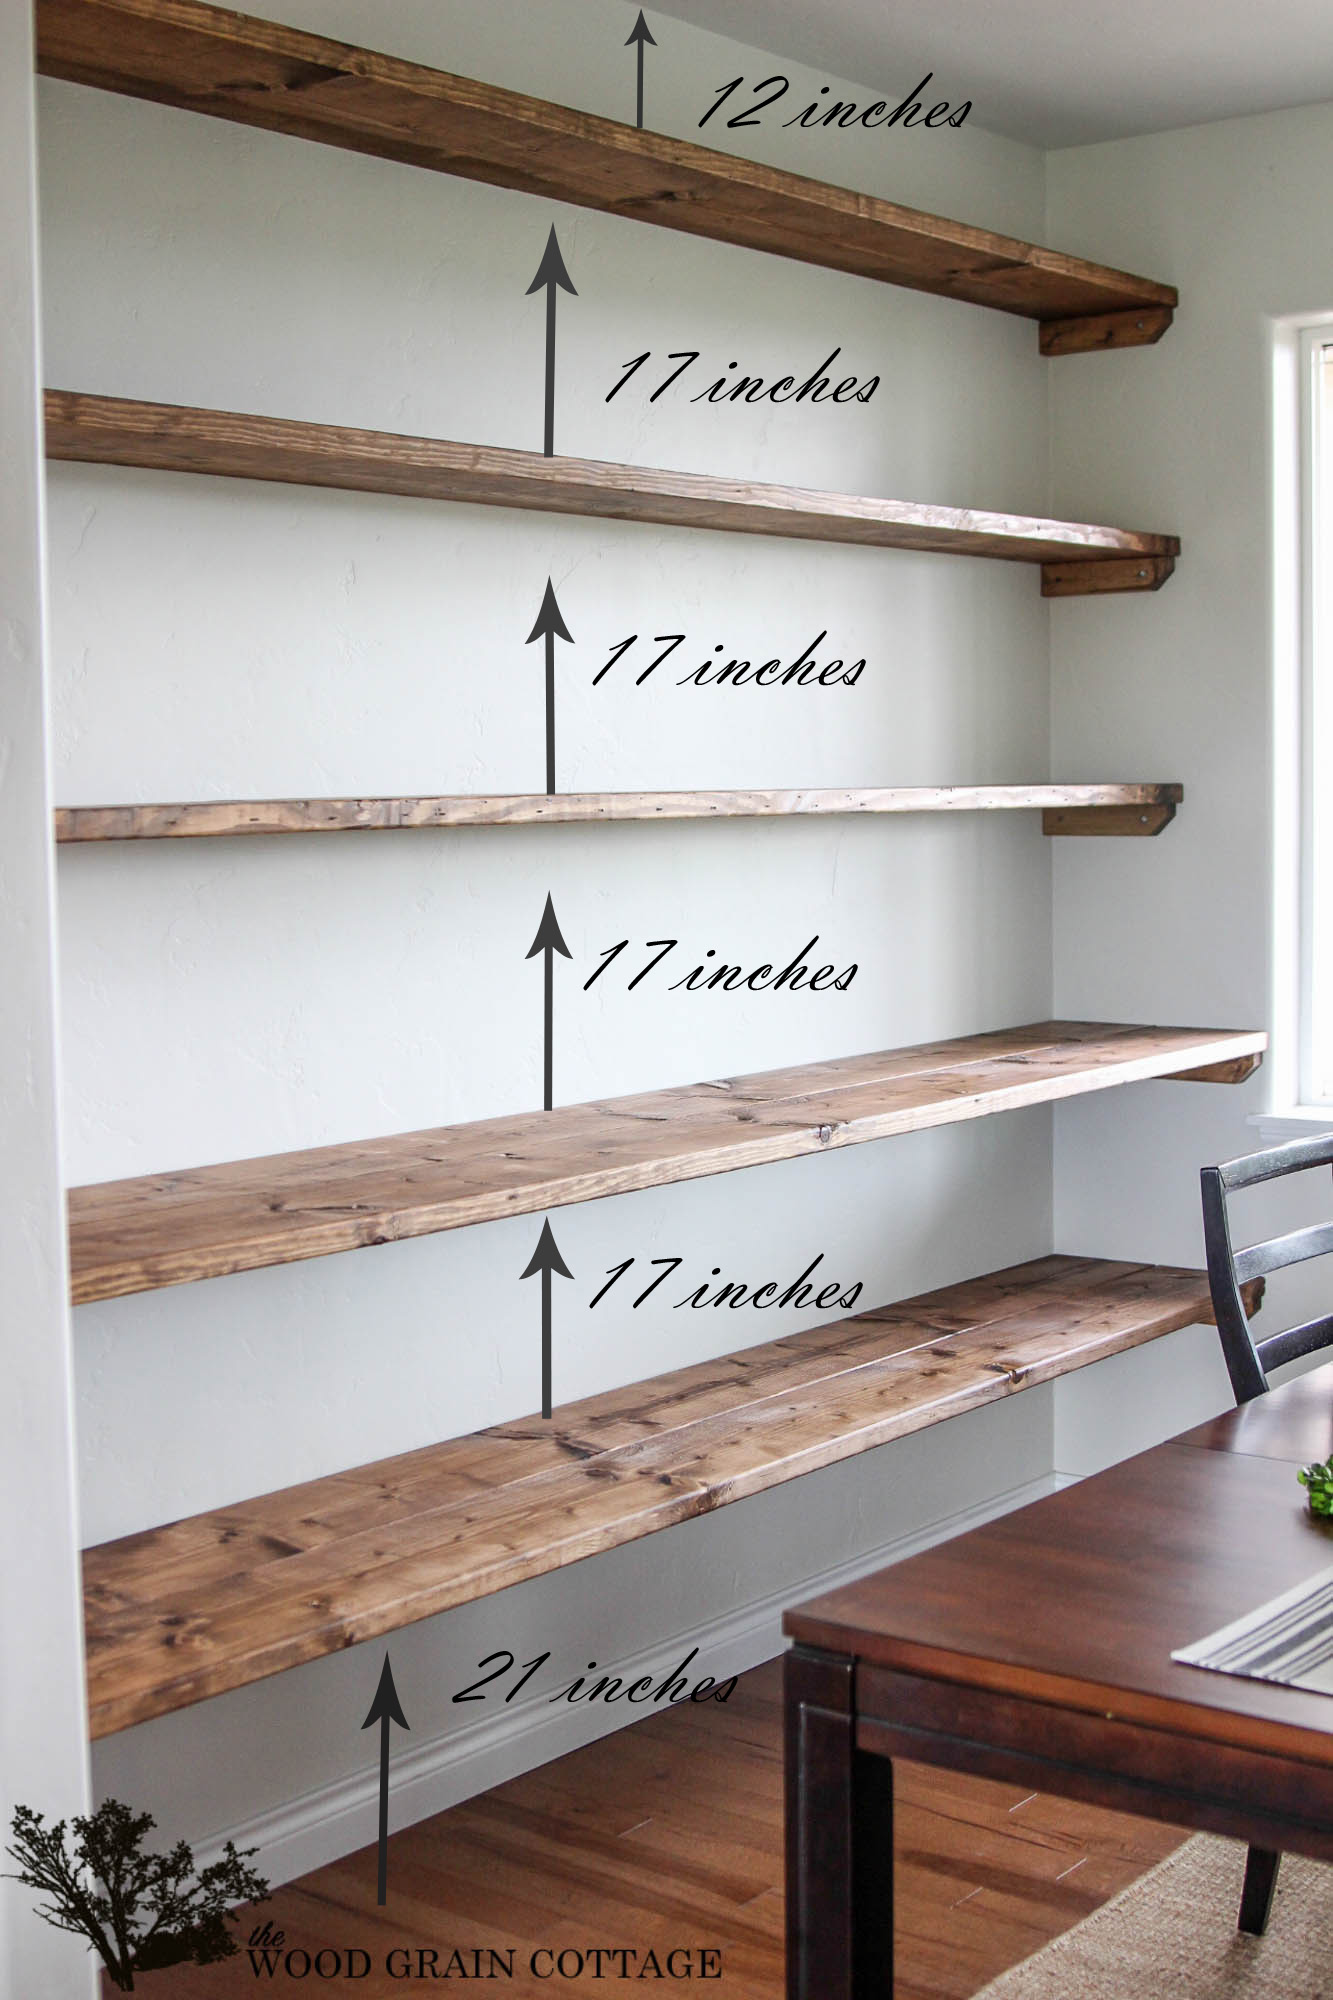
    2. Measure and Mark

    Use a level and a tape measure to accurately mark the desired location for your shelves on the wall. Ensure that the marks are level and spaced according to your design plans.

    3. Drill Pilot Holes

    Use a drill with an appropriate bit size to drill pilot holes at the marked locations on the wall. This will make it easier to drive screws into the wall.

    4. Install Mounting Brackets

    Attach the mounting brackets to the wall using the pilot holes you created. Ensure that the brackets are securely fastened to the wall studs for optimal support.

    5. Attach the Shelves

    Slide the shelves onto the mounting brackets, ensuring that they are level and securely attached.

    6. Secure the Shelves

    Some floating shelves require additional securing mechanisms. These can include screws or clips that attach to the back of the shelves and fit into corresponding holes in the mounting brackets.

    Styling Your Floating Shelves

    Once your floating shelves are installed, it's time to style them with your favorite items. Here are some ideas to get you started:

    Create a Theme

    Consider the theme of your room or the items you wish to display and create a cohesive aesthetic. For example, you could create a book-themed shelf, a plant-themed shelf, or a collection-themed shelf.

    Use Varying Heights

    Mix and match items of different heights to create visual interest and prevent a monotonous look. Use taller items on the back and shorter items towards the front.

    Add Texture and Color

    Incorporate items with various textures and colors to create a visually appealing and dynamic display. For example, you could combine wooden objects, metal sculptures, and colorful plants.

    Leave Some Space

    Avoid overcrowding your shelves. Allow some space between items to create a clean and uncluttered look. This will also highlight your belongings and create a sense of balance.

    Conclusion

    Floating shelves offer a stylish and practical solution for displaying your belongings, adding a touch of modern elegance to any room. By following these steps, you can successfully install and style floating shelves to create a unique and personalized look that reflects your individual style.

    Tuesday, November 19, 2024

    DIY Wooden Key Racks for Small Spaces That Are Easy to Sell

    DIY Wooden Key Racks for Small Spaces That Are Easy to Sell

    DIY Wooden Key Racks for Small Spaces That Are Easy to Sell

    Looking for a simple and stylish way to organize your entryway and make some extra cash? Look no further than DIY wooden key racks! These charming and functional pieces are a hot commodity, especially for those with limited space. Get ready to tap into your creative side and unleash your inner entrepreneur with this beginner-friendly guide.

    Choosing the Right Wood and Design

    The first step to crafting a winning key rack is selecting the perfect wood. Opt for affordable and readily available options like pine or plywood. These materials offer a blank canvas for your design vision, making them perfect for beginners. If you're feeling more adventurous, explore reclaimed wood for a unique rustic aesthetic.

    Keep It Simple, Keep It Stylish

    When it comes to design, simplicity is key. Avoid overcomplicating things with intricate carvings or complex shapes. Focus on creating a visually appealing yet practical piece. Here are a few ideas to get you started:

    • Classic Shelf Design: Create a simple rectangular shelf with a few hooks attached underneath. This timeless design works well for various spaces.
    • Geometric Shapes: Experiment with geometric shapes like circles, squares, or triangles. Cut out the shapes from your chosen wood and create a unique and modern key rack.
    • Rustic Charm: For a more natural look, leave the wood in its natural state or use a light stain. Add a few rustic details, like a salvaged piece of metal for a hook or a leather strap for hanging.

    Essential Tools and Materials

    Gather the following tools and materials to make your DIY key rack a reality:

    • Wood of your choice (pine, plywood, or reclaimed wood)
    • Saw (circular, jigsaw, or hand saw)
    • Sandpaper (various grits)
    • Measuring tape and pencil
    • Screwdriver and screws (for attaching hooks)
    • Hooks of your choice (metal, wooden, or leather)
    • Wood stain or paint (optional)
    • Finishing oil or sealant (optional)

    Construction: A Step-by-Step Guide

    Now it's time to bring your design to life! Follow these steps to create your key rack:

    1. Plan your design: Sketch out your design on paper. Include dimensions and decide on the placement of hooks.
    2. Cut the wood: Use your chosen saw to cut the wood according to your design measurements.
    3. Sand the wood: Smooth out any rough edges and imperfections with sandpaper. Start with coarse grit and gradually move to finer grits for a smoother finish.
    4. Attach the hooks: Mark the location of the hooks on the wood using a pencil. Use a screwdriver to attach the hooks securely with screws.
    5. Finish the wood (optional): Apply wood stain or paint to enhance the appearance of your key rack. Allow the stain or paint to dry completely.
    6. Add a sealant (optional): Apply a sealant to protect the wood and enhance its longevity.

    Marketing Your Key Racks

    With your key racks ready to shine, it's time to get them in front of potential buyers! Here are a few ways to market your creations:

    • Online marketplaces: List your key racks on popular platforms like Etsy, Amazon Handmade, or Facebook Marketplace.
    • Local craft fairs and markets: Showcase your work at local craft fairs and farmers markets.
    • Social media: Create a dedicated social media account for your business and use high-quality photos to showcase your key racks.
    • Word-of-mouth: Let friends and family know about your new business and encourage them to spread the word.

    With a little effort and creativity, you can turn your DIY wooden key racks into a profitable side hustle. So, what are you waiting for? Get those tools ready, and start creating!

    Modern Tiered Plant Stand Designs That Will Sell Like Hotcakes

    Modern Tiered Plant Stand Designs That Will Sell Like Hotcakes

    Modern Tiered Plant Stand Designs That Will Sell Like Hotcakes

    In the realm of interior design, plants play a pivotal role in infusing spaces with life, color, and a touch of natural beauty. To showcase these botanical treasures and enhance their visual appeal, tiered plant stands have emerged as a stylish and functional solution. This article delves into the latest trends in modern tiered plant stand designs, exploring innovative materials, captivating aesthetics, and practical features that are sure to captivate consumers and sell like hotcakes.

    Embracing Minimalist Aesthetics

    Modern design principles emphasize simplicity, clean lines, and a focus on functionality. Tiered plant stands that embody this aesthetic are characterized by their streamlined silhouettes, minimal ornamentation, and use of neutral color palettes. These stands seamlessly blend into any decor style, creating a sense of tranquility and order.

    Geometric Shapes and Sleek Profiles

    Geometric shapes, such as squares, rectangles, and circles, are prevalent in modern design, adding a touch of sophistication to tiered plant stands. Sleek, tapered legs and subtle curves further enhance the minimalist appeal, creating a visually striking yet understated presence.

    Neutral Color Palettes

    Modern plant stands often feature neutral color palettes, such as black, white, gray, and natural wood tones. These colors provide a timeless backdrop that allows the vibrant hues of the plants to take center stage. Matte finishes contribute to the understated elegance of the design.

    Innovative Materials and Sustainable Options

    Modern tiered plant stands are crafted from a variety of innovative and sustainable materials, reflecting a growing awareness of environmental responsibility and a desire for durable and long-lasting products.

    Metal and Glass

    Metal, particularly steel and brass, is a popular choice for modern plant stands due to its durability, strength, and sleek finish. Glass shelves provide a transparent and airy aesthetic, showcasing the plants from all angles. The combination of metal and glass creates a contemporary and elegant look.

    Wood and Bamboo

    Sustainable wood species, such as oak, walnut, and bamboo, offer a natural and warm aesthetic. These materials create a sense of grounding and connect the plant stand to the surrounding environment. Wood and bamboo are also readily renewable resources, promoting eco-conscious design.

    Recycled Materials

    An increasing number of plant stand manufacturers are embracing recycled materials, such as reclaimed wood and upcycled metal. This approach reduces waste and promotes sustainability, appealing to environmentally conscious consumers.

    Functionality and Versatility

    Modern tiered plant stands are designed with both functionality and versatility in mind, offering practical features that enhance their appeal and utility.

    Adjustable Heights

    Adjustable shelves allow users to customize the height of each tier, accommodating plants of different sizes and creating visually appealing arrangements. This flexibility also ensures optimal light exposure for all plants.

    Rolling Bases

    Rolling bases provide mobility, making it easy to reposition the plant stand and adjust its placement within the space. This feature is particularly beneficial for larger stands with multiple tiers.

    Water-Resistant Surfaces

    Water-resistant surfaces on the shelves prevent damage from spills and condensation, protecting the plant stand and preserving its aesthetic appeal.

    Trendsetting Features

    Modern tiered plant stands are incorporating innovative features that elevate their design and functionality, creating unique and captivating pieces.

    Integrated Lighting

    Some plant stands feature integrated LED lighting that provides optimal illumination for plants, promoting their healthy growth and creating a warm and inviting ambiance. The lights can be controlled remotely, allowing for customization of light intensity and timing.

    Integrated Watering Systems

    For added convenience, some plant stands include integrated watering systems that automatically deliver water to the plants, reducing the need for manual watering and ensuring consistent moisture levels. These systems are particularly beneficial for busy individuals or those who travel frequently.

    Indoor Gardens

    Tiered plant stands are increasingly being used to create indoor gardens, transforming small spaces into verdant oases. By incorporating various types of plants and foliage, these stands create a sense of tranquility and connect the indoors with the natural world.

    Marketing Strategies

    To ensure that modern tiered plant stand designs sell like hotcakes, effective marketing strategies are crucial. Here are some key considerations:

    Highlighting the Design and Functionality

    Marketing materials should showcase the unique design features and practical benefits of the plant stands. High-quality photography and product descriptions should emphasize the aesthetics, materials, and functionality.

    Targeting Specific Demographics

    Marketing campaigns should be tailored to specific demographics, such as young professionals, homeowners, and plant enthusiasts. Understanding their needs and preferences will help tailor messaging and reach the right audience.

    Utilizing Social Media

    Social media platforms are ideal for showcasing the plant stands in real-world settings, featuring user-generated content, and running contests and promotions. Engaging content and visual storytelling will attract potential customers.

    Partnering with Influencers

    Collaborating with influencers in the home decor and gardening niches can significantly boost visibility and credibility. Influencers can showcase the plant stands in their own homes and provide authentic reviews and styling tips.

    Conclusion

    Modern tiered plant stands are more than just functional pieces of furniture; they are stylish accents that enhance the beauty of plants and create a sense of tranquility in any space. By embracing minimalist aesthetics, innovative materials, and practical features, these stands cater to the evolving needs and preferences of contemporary consumers. Through effective marketing strategies, manufacturers can capitalize on the growing demand for stylish and functional plant stands, ensuring their success in the market.

    Monday, November 18, 2024

    How to Create Unique and Eye-Catching Wooden Wall Clocks

    How to Create Unique and Eye-Catching Wooden Wall Clocks

    Creating Unique and Eye-Catching Wooden Wall Clocks

    Wooden wall clocks have become a popular and stylish addition to homes, adding a touch of warmth and elegance to any interior. Their timeless appeal and versatility make them a perfect choice for a variety of design aesthetics. If you're looking to create something truly unique and eye-catching, crafting your own wooden wall clock is a rewarding endeavor that allows you to express your creativity and personalize your space. This comprehensive guide will delve into the essential steps and techniques to transform ordinary wood into a stunning timepiece that will be a focal point in your home.

    Choosing the Right Wood

    The choice of wood is crucial in determining the overall look and feel of your wall clock. Consider the following factors:

    Wood Species:

    • Hardwoods: Known for their durability and rich grain patterns, hardwoods like oak, maple, walnut, and cherry are excellent choices for wall clocks. They can withstand wear and tear and offer a classic, sophisticated aesthetic.
    • Softwoods: Pine, cedar, and fir are softer woods that are easier to work with. They offer a rustic and natural feel and are suitable for projects with intricate details.
    • Exotic Woods: For a truly unique and eye-catching piece, consider using exotic woods like ebony, rosewood, or zebrawood. Their striking colors and unique grain patterns will make your clock stand out.

    Wood Thickness:

    The thickness of the wood will determine the overall size and weight of your clock. Thicker wood provides greater stability and durability, while thinner wood allows for more intricate designs and lighter weight.

    Wood Finish:

    The wood finish will enhance the natural beauty of the wood and protect it from damage. Consider the following options:

    • Oil Finish: Oil finishes penetrate the wood, enhancing its natural color and grain patterns. They offer a subtle sheen and are easy to apply.
    • Polyurethane Finish: Polyurethane finishes provide a durable, protective layer that resists water and scratches. They offer a glossy or satin finish, depending on your preference.
    • Wax Finish: Wax finishes offer a soft, natural sheen and enhance the wood's warmth. They are easy to apply and maintain but offer less protection than other finishes.

    Designing Your Clock

    The design of your wooden wall clock is where your creativity truly shines. Consider the following aspects:

    Shape and Size:

    The shape of your clock can be as simple or complex as you desire. Traditional round clocks are classic, but you can also explore squares, rectangles, or even abstract shapes. The size of the clock will depend on the space it will occupy and your personal preference.

    Numbers and Hands:

    Choose the style of numbers and hands that complements your overall design. Roman numerals, Arabic numerals, or even custom-designed numbers are all options. For the hands, you can opt for traditional hands, skeleton hands, or even hands made from different materials like metal or acrylic.

    Decorative Elements:

    Adding decorative elements can elevate your clock to a true masterpiece. You can incorporate:

    • Inlay Work: This technique involves using different types of wood or other materials to create intricate patterns and designs on the surface of the clock.
    • Carving: You can carve intricate designs, floral motifs, or animal figures into the wood to add depth and dimension.
    • Painting: Adding a touch of paint can enhance the beauty of your clock and create a unique look. You can use stencils, freehand painting, or even decoupage techniques.

    Building Your Clock

    Once you have your design in place, it's time to build your clock. Follow these steps:

    Cut the Wood:

    Using a saw or jigsaw, carefully cut the wood to the desired shape and size. Ensure your cuts are precise for a polished final product.

    Assemble the Clock Face:

    If your design includes multiple pieces, assemble them using wood glue and clamps. Allow the glue to dry completely before proceeding.

    Install the Clock Mechanism:

    Select a clock mechanism that suits the size and design of your clock. Carefully drill a hole in the center of the clock face to accommodate the mechanism. Install the mechanism according to the manufacturer's instructions.

    Attach the Hands:

    Attach the hands to the clock mechanism, ensuring they are securely fastened and move freely.

    Add Finishing Touches:

    Sand the wood to create a smooth surface and remove any rough edges. Apply your chosen wood finish to protect the wood and enhance its beauty. Allow the finish to dry completely before installing the clock on the wall.

    Tips for Creating Unique Wooden Wall Clocks

    • Embrace Imperfections: Distressed wood or natural imperfections can add character and charm to your clock. Embrace these unique features rather than trying to hide them.
    • Experiment with Colors: Don't be afraid to experiment with different paint colors, stains, or finishes to create a unique look. You can even use metallic paints or create ombre effects for a modern touch.
    • Use Sustainable Materials: Opt for reclaimed wood or salvaged wood to create an eco-friendly and unique clock. These materials often have interesting textures and histories that can add character to your project.
    • Incorporate Personal Touches: Add a touch of personal flair to your clock by incorporating meaningful elements like family initials, favorite quotes, or even pressed flowers.
    • Seek Inspiration: Draw inspiration from vintage clocks, nature, or other art forms to create a truly unique and eye-catching piece.

    Creating a wooden wall clock is a rewarding and creative project that allows you to express your personal style and bring a touch of warmth and elegance to your home. By following these steps and incorporating your unique design ideas, you can craft a timepiece that will be cherished for years to come.

    Wednesday, November 13, 2024

    DIY Christmas Countdown Calendar with Wood

    DIY Christmas Countdown Calendar with Wood

    DIY Christmas Countdown Calendar with Wood: Let's Build Some Festive Fun!

    Alright, friends, Christmas is just around the corner and you know what that means? It's time to get crafty and build a **DIY Christmas countdown calendar**! This year, forget those flimsy cardboard calendars that fall apart after a week. We're going for something **durable, charming, and totally unique**. Think rustic wooden boxes, charming little drawers, or even a fun advent-style door opening system. Let's get those creative juices flowing!

    Why Choose a Wooden Countdown Calendar?

    There's just something so magical about wood, isn't there? It's warm, natural, and brings a touch of rustic charm to any holiday decor. Plus, a wooden calendar is much sturdier than its paper counterparts. You can use it year after year, filling it with new treats and surprises for your loved ones.

    Ideas to Get You Started

    Here's where the fun truly begins! The possibilities are endless, so let your imagination run wild. Here are some ideas to spark your creativity:

    1. Classic Wooden Boxes

    Think of a simple wooden crate or a set of small boxes, each numbered from 1 to 24. You can paint them, stain them, decorate them with festive motifs - the possibilities are truly endless! Fill each box with a tiny gift, a treat, or even a cute holiday-themed note.

    2. Adorable Little Drawers

    Imagine a sweet little wooden cabinet with 24 tiny drawers. Each drawer can hold a small surprise, and you can decorate the cabinet with Christmas lights, festive ribbons, or even a cute miniature Christmas village scene.

    3. Advent-Style Doors

    This one is perfect for a dramatic reveal! Use a wooden board, a piece of plywood, or even an old window frame to create a series of 24 doors. Each door can hide a small gift or a clue to a bigger surprise. You can use hinges to create traditional doors, or get creative with magnetic closures or even puzzle pieces that unlock the secret compartments.

    4. Wooden Wall Calendar

    Want something truly unique? Create a wooden wall calendar with 24 separate squares or circles. Each day, you can reveal a special treat or a fun activity to do as a family.

    Essential Tools and Materials

    No need to worry, you don't need to be a seasoned carpenter to create this magical countdown calendar. You can use a variety of tools depending on your project, but here are some basic essentials:

    • Wood: Choose a wood that is easy to work with, like pine or plywood. You can find pre-cut boards at most home improvement stores.
    • Saw: You'll need a saw to cut the wood to your desired size. A jigsaw is great for intricate shapes, while a handsaw is more suitable for straight cuts.
    • Screwdriver or Drill: You'll need these to assemble your calendar and attach any decorative elements.
    • Sandpaper: Sanding the wood will create a smooth finish and prevent splinters.
    • Paint or Stain: This is where you can unleash your creativity and personalize your calendar. Choose colors that match your holiday decor.
    • Brushes or Spray Paint: Apply your paint or stain with these tools. A brush allows for more control and texture, while spray paint offers a smoother and faster application.
    • Decorative Elements: Let your imagination run wild! Think ribbons, glitter, snowflakes, or even small Christmas ornaments to personalize your creation.
    • Glue: To attach those decorative elements and give your project that extra touch of festive sparkle.
    • Numbers: You can purchase pre-made wooden numbers or use stencils to create your own. Get creative with fonts and sizes!
    • Small Boxes, Drawers, or Containers: If you're creating a box-style or drawer-style calendar, you'll need these to hold your treats and surprises.
    • Hinges, Magnetic Closures, or Puzzle Pieces: To create those magical opening doors or compartments, you'll need these functional elements.

    Building Your Wooden Christmas Countdown Calendar: Step-by-Step

    Now that you have your tools and materials ready, let's dive into the fun part - building your own wooden Christmas countdown calendar. Remember, this is just a general guide. You can adjust it based on your specific design and materials.

    1. Sketch Your Design

    Before you start cutting wood, grab a pencil and paper and sketch out your dream calendar. Decide on the size, shape, and overall design.

    2. Cut the Wood

    Carefully cut the wood to the dimensions you've sketched out. Use a saw that's appropriate for the type of wood and the cuts you need to make.

    3. Sand the Edges

    Smooth out those rough edges with sandpaper. You want a comfortable and safe surface for your project.

    4. Paint or Stain the Wood

    Let your creativity shine! Paint the wood in your desired color or stain it for a natural wood finish. You can even create different patterns or embellishments.

    5. Assemble Your Calendar

    Follow your design and assemble the various pieces using glue, screws, or nails. Make sure everything is secure and sturdy before moving on to the next steps.

    6. Attach the Boxes, Drawers, or Doors

    If you're using boxes, drawers, or doors, attach them securely to the main calendar structure. You can use hinges, magnetic closures, or puzzle pieces to create the opening mechanisms.

    7. Add the Numbers

    Use glue or screws to attach the numbers to each box, drawer, or door.

    8. Decorate Your Calendar

    Now it's time to add those festive touches! Use ribbons, glitter, snowflakes, ornaments, or any other embellishments that inspire you.

    9. Fill Your Calendar with Treats and Surprises

    The moment you've been waiting for! Fill each box, drawer, or door with small gifts, treats, or notes. Remember to keep the age of your recipients in mind when choosing the surprises.

    Tips for Success

    Here are some additional tips to ensure your DIY Christmas countdown calendar is a hit:

    • Start Early: Crafting takes time! Start your project a few weeks in advance to avoid rushing.
    • Safety First: Always use safety goggles and wear appropriate clothing when working with tools.
    • Embrace Imperfection: Don't worry about getting everything perfect. A handmade calendar filled with love is what matters most.
    • Add a Personal Touch: Include photos, personalized notes, or small tokens that will make your calendar truly special.
    • Have Fun: This is a creative project, so relax and enjoy the process!

    There you have it! A DIY Christmas countdown calendar that's sure to bring joy and excitement to your holiday celebrations. From classic wooden boxes to whimsical advent doors, the possibilities are endless. So get crafty, unleash your inner artist, and create a calendar that captures the magic of the season!

    Tuesday, November 12, 2024

    Coffee Table DIY Ideas: Step-by-Step Plans PDF

    Coffee Table DIY Ideas: Step-by-Step Plans PDF

    Coffee Table DIY Ideas: Step-by-Step Plans PDF

    A coffee table is a staple piece of furniture in any living room. It's where you set down your coffee and snacks, and it's also a great place to display books, magazines, and other decorative items. If you're looking for a new coffee table, or just want to add some personality to your living room, consider building your own! You don't need any special skills to make a coffee table, just a few basic tools and some time.

    There are lots of different DIY coffee table projects out there. To help you get started, we've compiled a list of the best coffee table plans, including step-by-step instructions and materials lists.

    You can also find tons of inspiration for your DIY coffee table online. Check out sites like Pinterest, Etsy, and Instructables. There are plenty of tutorials that will help you make a coffee table that's perfect for your style.

    1. Pallet Coffee Table

    Pallet coffee tables are a popular choice for DIYers. They're inexpensive and easy to find, and you can easily customize them to fit your style. For this project, you'll need a pallet, some wood stain or paint, and a few basic tools.

    Materials:

    • One pallet
    • Wood stain or paint (optional)
    • Screws
    • Drill
    • Saw (optional)
    • Sandpaper
    • Measuring tape
    • Level

    Instructions:

    1. Clean the pallet. Use a brush to remove any dirt or debris. You may also want to sand the pallet to create a smoother surface.
    2. Stain or paint the pallet. If you want to change the color of the pallet, apply a stain or paint of your choice.
    3. Attach the legs. If the pallet doesn't have legs, you can attach some using screws and a drill.
    4. Sand and seal the pallet. Once the stain or paint is dry, sand the pallet again to smooth out any rough edges. You can then seal the pallet with a polyurethane finish to protect it from scratches and spills.

    2. Pipe Coffee Table

    Pipe coffee tables are another trendy DIY project. They're made with industrial pipe fittings and can be customized to create a unique and modern look. For this project, you'll need some pipe fittings, a wooden tabletop, and a few tools.

    Materials:

    • Pipe fittings (enough to create the desired table legs)
    • Wooden tabletop (size and shape of your choice)
    • Thread sealant tape
    • Adjustable wrench
    • Screws
    • Drill
    • Level

    Instructions:

    1. Cut the pipes to size. Using a pipe cutter or hacksaw, cut the pipes to the desired length for the table legs.
    2. Assemble the legs. Connect the pipe fittings together to form the legs of the table.
    3. Attach the tabletop. Screw the tabletop to the top of the pipe legs.
    4. Level the table. Once the tabletop is attached, use a level to ensure that the table is level.

    3. Wooden Coffee Table

    A wooden coffee table is a classic choice. For this project, you'll need some wood, a saw, a drill, and some screws. You can use plywood, pine, or any other type of wood you prefer.

    Materials:

    • Wood (plywood, pine, or other type of wood)
    • Saw
    • Drill
    • Screws
    • Wood stain or paint (optional)
    • Sandpaper
    • Measuring tape
    • Level

    Instructions:

    1. Cut the wood to size. Measure and cut the wood to the desired dimensions for the tabletop and legs.
    2. Assemble the legs. Join the legs together using screws and a drill.
    3. Attach the tabletop. Screw the tabletop to the top of the legs.
    4. Sand and finish the table. Once the table is assembled, sand it down to smooth out any rough edges. You can then apply a stain or paint if desired.

    These are just a few DIY coffee table ideas to get you started. With a little creativity, you can create a unique and stylish coffee table that's perfect for your home.

    Guide to Cold Frame Building for All Seasons

    Guide to Cold Frame Building for All Seasons

    Guide to Cold Frame Building for All Seasons

    Cold frames are a gardener's best friend, offering a protected space for seedlings, tender plants, and even overwintering vegetables. By extending the growing season both in spring and fall, cold frames make gardening a more fulfilling experience. Building a cold frame isn’t just about creating a functional structure; it's about adding an aesthetically pleasing element to your garden that complements your existing landscaping. But with so many different designs available, choosing the right one can be overwhelming. This guide will take you through the process of building a cold frame from scratch, ensuring you have a structure that meets your needs and budget.

    Choosing the Right Location

    The success of your cold frame depends largely on its location. Choose a spot that receives full sun for at least six hours a day, preferably in the morning, as this will help warm the air inside. Make sure the area is well-drained, preventing waterlogging and root rot. Avoid placing your cold frame near trees or large buildings that could cast shade throughout the day. Consider the direction of prevailing winds and build a cold frame that is sheltered from strong gusts.

    Materials You'll Need

    There are many materials you can use to construct a cold frame, each with its advantages and disadvantages. Here are some popular choices:

    Framing

    The frame provides the structure for your cold frame. Here are some common options:

    • Wood: Inexpensive and readily available, wood is a popular choice. Choose treated lumber for durability and resistance to rot.
    • Metal: Aluminum or galvanized steel offer durability and longevity, especially in harsher climates.
    • PVC Pipe: Lightweight and easy to work with, PVC pipe provides a strong and affordable option for cold frame construction.

    Covering

    The covering material plays a vital role in regulating the temperature inside your cold frame. Choose a material that allows light to penetrate while providing insulation:

    • Glass: Traditional and effective, glass offers excellent light transmission and insulation. However, it can be heavy and prone to breakage.
    • Plexiglass: Lighter and more durable than glass, plexiglass provides good light transmission and insulation. It is also available in different thicknesses to suit different needs.
    • Polycarbonate: A modern alternative to glass and plexiglass, polycarbonate is lightweight, strong, and offers excellent insulation. It is also available in various colors and textures.
    • Greenhouse Plastic Film: Budget-friendly and lightweight, greenhouse plastic film provides good light transmission and insulation. It is available in different thicknesses, with thicker films offering better insulation.

    Building Your Cold Frame

    Once you've chosen your materials, it's time to build your cold frame. Here's a step-by-step guide:

    1. Measure and cut the materials according to your chosen design. Use a level to ensure all corners are square and the frame is level.
    2. Assemble the frame using screws or nails. If using wood, predrill holes to prevent splitting. Apply wood glue for added strength.
    3. Construct the lid, following the same steps as the base. Attach hinges to the lid for easy opening and closing.
    4. Add a vent to the lid to control temperature and humidity. You can use a piece of wood or metal with a vent hole or a commercially available vent kit.
    5. Attach the covering to the frame. For glass or plexiglass, use silicone sealant to create a weatherproof seal. For polycarbonate, use screws or bolts with washers.
    6. Place your cold frame in its chosen location and add a layer of soil.

    Tips for Using Your Cold Frame

    Now that your cold frame is built, here are some tips for getting the most out of it:

    • Monitor the temperature inside the cold frame regularly, especially during cold snaps or hot days. You can use a thermometer to track the temperature.
    • Adjust the vent to regulate the temperature and humidity. Open it during warm days and close it at night or during cold spells.
    • Water your plants as needed, being careful not to overwater. The soil inside the cold frame should be consistently moist but not soggy.
    • Thin seedlings as needed to prevent overcrowding.
    • Protect your plants from pests and diseases by regularly inspecting them and removing any affected leaves or stems.
    • Clean your cold frame at the end of the season to prevent disease and pests from overwintering.

    Building a cold frame is a rewarding project that can significantly enhance your gardening experience. With careful planning and construction, you can enjoy fresh vegetables and flowers for longer, even during the colder months.

    DIY Cold Frame for Spring and Fall Gardens

    DIY Cold Frame for Spring and Fall Gardens

    DIY Cold Frame for Spring and Fall Gardens

    A cold frame is a simple, yet incredibly useful structure that can extend your gardening season significantly. It acts as a mini-greenhouse, providing a sheltered environment that allows you to start seeds early in the spring, protect tender seedlings from frost in the fall, and even overwinter some hardy plants.

    Building your own cold frame offers numerous advantages: it's a cost-effective solution compared to purchasing a pre-made one, it allows for customization to fit your garden's needs, and it's a rewarding project that can be enjoyed by gardeners of all skill levels. This article will guide you through the process of building a DIY cold frame that will enhance your gardening experience.

    Materials and Tools

    Before embarking on your cold frame construction, gather the necessary materials and tools. The following list provides a comprehensive overview:

    Materials

    • Framing:
      • Pressure-treated lumber (2x4s or 2x6s) for the frame and legs
      • Optional: Cedar, redwood, or other rot-resistant wood for a more natural look
    • Glazing:
      • Glass panels (e.g., salvaged windows, polycarbonate sheets, acrylic sheets)
      • Silicone sealant or construction adhesive
    • Foundation:
      • Concrete blocks or bricks
      • Landscape fabric or weed barrier
    • Other:
      • Screws or nails
      • Wood glue (optional)
      • Weather stripping (optional)
      • Soil or potting mix
      • Optional: Hinges and a latch for a hinged lid

    Tools

    • Saw (circular, miter, or hand saw)
    • Drill and drill bits
    • Level
    • Measuring tape
    • Pencil or marker
    • Hammer or impact driver
    • Safety glasses
    • Gloves

    Design Considerations

    The design of your cold frame will depend on factors such as your space, desired capacity, and personal preferences. Consider the following factors when planning your build:

    • Size and shape: Determine the optimal dimensions based on the space available and the types of plants you plan to grow. A rectangular shape is common and versatile, but square or even curved designs are also possible.
    • Height: Aim for a height that provides adequate space for plants to grow while allowing easy access for planting, tending, and harvesting. A height of 18-24 inches is generally suitable.
    • Glazing material: Glass offers excellent light transmission, while polycarbonate and acrylic are lightweight, shatter-resistant, and often more affordable. Choose the option that best suits your needs and budget.
    • Orientation: Position your cold frame facing south to maximize sunlight exposure, particularly during the colder months.

    Construction Steps

    Now that you've gathered your materials and finalized your design, follow these steps to construct your cold frame:

    1. Prepare the Foundation

    • Choose a sunny location with good drainage. If necessary, level the area and remove any debris.
    • Lay out your concrete blocks or bricks to create a base for the frame. Ensure the foundation is level and the blocks are spaced evenly.
    • Optional: Cover the foundation with landscape fabric or weed barrier to prevent weeds from growing through the cold frame.

    2. Build the Frame

    • Cut the lumber to size based on your desired dimensions. Use a saw to create the frame pieces for the base, sides, and top. Make sure all corners are square and the edges are smooth.
    • Assemble the frame by joining the pieces with screws or nails. Apply wood glue for additional strength if desired. Secure the corners with corner braces or metal brackets for added stability.
    • Optional: If you're building a hinged lid, attach hinges to one side of the frame and the corresponding side of the top panel.

    3. Attach the Glazing

    • Clean the surface of your glass or plastic glazing material with rubbing alcohol or a glass cleaner.
    • If using glass, apply silicone sealant or construction adhesive along the edges of the frame where the glass will be placed. Press the glass firmly into the sealant, ensuring it's level and flush with the frame.
    • If using polycarbonate or acrylic sheets, secure them to the frame with screws or clips. Pre-drill holes for screws to prevent cracking.
    • Optional: If you're using a hinged lid, attach a latch or a hook to secure the lid in place.

    4. Finishing Touches

    • Apply a sealant to the exterior of the frame to prevent rot and moisture damage. Stain or paint the wood for a more aesthetic finish.
    • Optional: Add weather stripping around the edges of the glazing to improve insulation and prevent drafts.
    • Fill the cold frame with soil or potting mix. Ensure proper drainage by adding a layer of gravel or broken terracotta pots at the bottom of the frame.

    Using Your Cold Frame

    Once your DIY cold frame is complete, you can begin using it to extend your gardening season. Here are some ways to utilize this valuable tool:

    Starting Seeds

    • Start seeds indoors 4-6 weeks before your last frost date. Transplant them into the cold frame once the seedlings are large enough to handle.
    • The cold frame provides a protected environment, shielding delicate seedlings from harsh weather conditions and pests.

    Protecting Tender Plants

    • In the early spring and late fall, use your cold frame to protect frost-sensitive plants from damaging temperatures.
    • Plants like lettuce, spinach, kale, and radishes benefit from the extra protection provided by a cold frame.

    Overwintering Plants

    • Some hardy plants, like pansies, violas, and certain herbs, can be overwintered in a cold frame.
    • Provide adequate drainage and ensure the plants are protected from extreme temperatures.

    Maintenance Tips

    To ensure your cold frame performs optimally, follow these maintenance tips:

    • Ventilation: Regularly open the lid of your cold frame, especially during warmer days, to prevent overheating and promote good airflow.
    • Moisture Control: Check soil moisture levels and water as needed. Avoid overwatering, which can lead to root rot.
    • Pest Control: Monitor for pests and take appropriate measures to control them.
    • Cleaning: Clean the inside of the cold frame regularly to remove debris and prevent disease buildup.

    Conclusion

    Building a DIY cold frame is a rewarding and practical project that can significantly enhance your gardening experience. By extending your growing season and providing a protected environment for your plants, a cold frame can contribute to bountiful harvests and a more enjoyable gardening journey.

    How to craft a wooden clock from scratch

    How to craft a wooden clock from scratch

    Crafting a Wooden Clock from Scratch: A Comprehensive Guide

    Creating a wooden clock from scratch is a rewarding endeavor that blends woodworking skills with a touch of artistic expression. This comprehensive guide will walk you through the process, from initial design to final finishing, enabling you to craft a unique and timeless piece for your home or as a cherished gift.

    I. Planning and Design

    1. Defining Your Vision

    Before embarking on the construction, it's essential to have a clear vision of the clock you wish to create. Consider the following:

    • Style: Do you envision a rustic, modern, minimalist, or ornate design?
    • Size and Shape: Determine the desired dimensions and overall form, whether round, square, rectangular, or something more unconventional.
    • Materials: Select the type of wood that complements your style and desired aesthetic. Options include hardwoods like oak, walnut, cherry, or softwoods like pine or cedar.
    • Movement: Choose the clock movement mechanism based on your desired features. Quartz movements are affordable and reliable, while mechanical movements offer a more traditional and intricate experience.

    2. Sketching and Dimensioning

    Once you have a general concept, sketch out your design on paper. This allows you to experiment with different shapes, proportions, and details. Note the key dimensions, including the clock face size, thickness of the wood, and the placement of the hands and movement.

    3. Gathering Materials

    Based on your design and chosen materials, gather the necessary supplies:

    • Wood: Choose wood boards with a thickness suitable for your design. Consider purchasing pre-cut pieces or working with rough lumber, depending on your comfort level and woodworking experience.
    • Clock Movement: Ensure you select a movement compatible with the desired clock face size and your chosen design. Many online retailers specialize in clock movements.
    • Clock Hands: Select hands that complement the style and size of your clock. Consider materials like metal, wood, or acrylic.
    • Clock Face: You can create a custom clock face using wood, metal, or plastic, or purchase a pre-made dial. If creating a custom face, consider using a design template for accurate placement of numbers or markings.
    • Wood Glue: Choose a high-quality wood glue for secure bonding of your components.
    • Woodworking Tools: Gather the necessary tools for cutting, shaping, and sanding the wood, including a saw, drill, sander, and router, if applicable.
    • Finishing Materials: Choose finishes that protect and enhance the natural beauty of your wood. Options include wood stains, paints, varnishes, and oils.

    II. Construction

    1. Cutting and Shaping

    Begin by cutting your wood boards to the desired dimensions using a saw or a table saw. Ensure precise cuts for a clean and professional look. Shape the wood according to your design using a router or hand tools. This step may involve creating rounded edges, decorative elements, or creating a unique frame for the clock face.

    2. Assembling the Clock Case

    Carefully assemble the clock case according to your design. Use wood glue for secure bonding and clamps to hold the pieces together while the glue dries. Consider using dowels, biscuits, or other joinery techniques for added strength and stability. Allow the glue to dry completely before moving to the next step.

    3. Mounting the Clock Movement

    Once the case is assembled and dried, create a recess in the back of the clock case to accommodate the clock movement. Ensure the recess is deep enough to allow the hands to move freely and the movement to fit snugly. Securely mount the clock movement within the recess, taking care not to damage the delicate mechanism.

    4. Installing the Clock Hands

    Attach the clock hands to the movement's spindle, following the manufacturer's instructions. Pay attention to the correct order of the hour and minute hands, and ensure they are securely fastened to the movement. If necessary, trim the hands to ensure they don't touch the clock face or case.

    5. Creating the Clock Face

    If you are making a custom clock face, create it using your chosen materials. You can cut and shape wood, metal, or plastic to create the desired shape and size. Use a design template to ensure accuracy and proper placement of numbers, markings, or any decorative elements.

    6. Attaching the Clock Face

    Mount the clock face securely to the front of the clock case. Depending on your design and materials, you can use wood screws, adhesives, or a combination of both. Ensure the clock face is centered and level for a balanced and aesthetically pleasing look.

    III. Finishing and Refinement

    1. Sanding and Polishing

    Once all components are assembled, thoroughly sand the entire clock, starting with coarser grits to remove rough edges and imperfections. Progressively move to finer grits for a smooth, polished finish. Pay attention to corners and edges, sanding them gently to avoid sharp edges.

    2. Applying Finishes

    Apply your chosen finishes, such as stains, paints, varnishes, or oils, according to the manufacturer's instructions. Ensure even coats and allow ample drying time between coats. Consider using a sealant or topcoat to protect the finish and enhance its durability.

    3. Adding Final Touches

    Add any final decorative touches to personalize your clock. These could include adding a small handle to the clock face, inlaying decorative elements, or adding a protective layer of wax. Let your creativity guide you and create a unique piece that reflects your personal style.

    IV. Installation and Operation

    1. Setting the Time

    After completing the final touches, carefully set the time on your clock movement. If your movement is quartz, there will likely be a crown or button to adjust the time. If it's a mechanical movement, refer to the manufacturer's instructions for setting the time.

    2. Installing a Battery (If Applicable)

    If you're using a quartz movement, install a battery in the battery compartment of the movement. Ensure you use a battery with the correct voltage and size.

    3. Hanging or Displaying

    Securely mount or hang your finished clock in your chosen location. Ensure the clock is level and securely mounted to prevent accidental damage. You can use a variety of hanging methods, including a hook, a keyhole slot, or a D-ring.

    V. Enjoying Your Creation

    Congratulations! You have now successfully crafted a unique and functional wooden clock from scratch. Enjoy your creation as a testament to your craftsmanship and a beautiful addition to your home.

    Squirrel Den Box PDF Plans for Quick Download

    Squirrel Den Box PDF Plans for Quick Download

    Squirrel Den Box PDF Plans for Quick Download

    Are you looking for a fun and rewarding project to enhance your backyard wildlife habitat? Building a squirrel den box is a simple yet fulfilling endeavor that can bring joy to both you and the furry residents of your garden. This comprehensive guide will provide you with detailed PDF plans for quick download, enabling you to craft a cozy and safe dwelling for these delightful creatures.

    Squirrels are essential components of a balanced ecosystem, playing a crucial role in seed dispersal and contributing to biodiversity. By providing them with a den box, you are not only offering them shelter but also fostering a harmonious relationship between humans and wildlife.

    Benefits of Building a Squirrel Den Box

    Building a squirrel den box offers a multitude of benefits, including:

    • Providing Shelter: A den box offers squirrels a safe haven from predators, inclement weather, and the harsh elements.
    • Encouraging Nesting: The box provides a secure and comfortable space for squirrels to build their nests and raise their young.
    • Supporting Biodiversity: By attracting squirrels to your backyard, you contribute to the overall biodiversity of your local ecosystem.
    • Educational Value: Building the den box can be a rewarding and educational experience for you and your family, fostering an appreciation for wildlife and nature.
    • Aesthetic Appeal: A well-constructed squirrel den box can add a charming touch to your backyard landscape.

    Essential Materials for Construction

    Before embarking on your project, ensure you have the following materials readily available:

    • Wood: Choose durable and weather-resistant wood such as cedar, redwood, or pressure-treated pine. Avoid using plywood as it is susceptible to moisture damage.
    • Screws: Use galvanized or stainless-steel screws to prevent rusting and ensure a secure construction.
    • Saw: A circular saw or a handsaw will be needed for cutting the wood to size.
    • Drill: A drill with a variety of drill bits will be useful for pre-drilling holes for screws and creating ventilation openings.
    • Measuring Tape: Ensure accurate dimensions for precise cuts and assembly.
    • Level: Ensure the box is installed level to prevent water pooling and promote stability.
    • Safety Glasses and Gloves: Protect your eyes and hands during construction.

    Squirrel Den Box PDF Plans

    To access the detailed squirrel den box PDF plans, simply click on the download link below. These plans provide comprehensive instructions, diagrams, and material specifications, guiding you through the entire construction process.

    [Insert Download Link]

    Step-by-Step Construction Guide

    The PDF plans will provide a detailed guide to the construction process. Here is a general overview of the steps involved:

    1. Cut the Wood Components

    Using the provided measurements, carefully cut the wood components for the box, including the front, back, sides, roof, and floor.

    2. Assemble the Box Frame

    Join the front, back, and sides using screws to create the box frame. Ensure that the corners are square and the frame is sturdy.

    3. Attach the Roof

    Attach the roof to the box frame using screws. Consider adding a slight overhang to protect the entrance from rain.

    4. Install the Floor

    Secure the floor to the bottom of the box frame using screws.

    5. Create the Entrance

    Cut an entrance hole in the front of the box. The ideal size for a squirrel entrance is approximately 3-4 inches in diameter.

    6. Add Ventilation

    Drill a few small ventilation holes in the back of the box to allow for air circulation and prevent moisture buildup.

    7. Apply a Finish (Optional)

    Consider applying a wood sealant or stain to protect the box from weather damage and enhance its durability.

    Installation and Placement

    Once the den box is constructed, it's time to choose the perfect location for its installation:

    • Height: Mount the den box approximately 10-15 feet above ground to deter predators. Consider attaching it to a tree or a sturdy post.
    • Shelter and Protection: Choose a location that offers some protection from the elements. For example, a tree with thick foliage or a sheltered area against a wall.
    • Facing: The entrance should face away from prevailing winds and rain.
    • Access: Ensure that the box is accessible for routine cleaning and maintenance.

    Maintenance and Care

    Regular maintenance is essential for ensuring the den box remains safe and appealing to squirrels. Here are some tips:

    • Clean the Box Regularly: Remove any debris, old nesting materials, or signs of parasites. Cleaning can be done during the fall or spring when the squirrels are less active.
    • Inspect for Damage: Regularly check for any damage to the box, such as rot, cracks, or loose screws. Repair or replace damaged components as needed.
    • Monitor Activity: Observe the box for signs of squirrel activity, such as nesting materials, droppings, or young squirrels. This will help you ensure the box is being used effectively.

    Enjoy Your Backyard Habitat

    Building a squirrel den box is a rewarding project that can enhance your backyard wildlife habitat. By providing these delightful creatures with a safe and comfortable dwelling, you can enjoy the beauty of nature and foster a harmonious relationship with the wildlife that shares your space.

    Building a Vintage-Inspired Bedside Cabinet

    Building a Vintage-Inspired Bedside Cabinet

    Building a Vintage-Inspired Bedside Cabinet

    A bedside cabinet is a staple in any bedroom, providing a convenient spot to store books, a lamp, and other essentials. A vintage-inspired bedside cabinet can add a touch of charm and character to your space, making it feel more inviting and personalized. Building your own vintage-inspired bedside cabinet allows you to customize its size, style, and finish to perfectly complement your bedroom decor. This project is accessible for DIYers of all skill levels, requiring basic woodworking tools and knowledge. With a bit of time and effort, you can create a unique and functional piece that you'll cherish for years to come.

    Planning Your Project

    Before diving into the construction, it's essential to plan your project carefully. This includes determining the size, style, and materials you want to use.

    Determining the Size

    Consider the space available in your bedroom and the size of your bed. Measure the area where you want to place the cabinet to ensure it fits comfortably. A typical bedside cabinet is around 24 inches wide, 18 inches deep, and 28 inches tall. You can adjust these dimensions based on your preferences and the available space.

    Choosing a Style

    Vintage-inspired bedside cabinets come in various styles, from mid-century modern to rustic farmhouse. Browse online for inspiration and consider the overall style of your bedroom. Some popular vintage styles include:

    • Mid-Century Modern: Clean lines, tapered legs, and a simple design.
    • Rustic Farmhouse: Distressed wood, hardware, and a farmhouse-inspired look.
    • Shabby Chic: Soft pastel colors, distressed finishes, and intricate details.
    • Industrial Chic: Metal accents, exposed hardware, and a vintage-inspired feel.

    Selecting Materials

    The type of wood you choose will significantly impact the look and feel of your bedside cabinet. Some popular wood choices for vintage-inspired projects include:

    • Pine: Affordable, softwood that's easy to work with.
    • Oak: Durable hardwood with a classic look.
    • Maple: Hard, strong wood with a smooth, fine grain.
    • Cherry: Rich reddish-brown wood with a beautiful grain pattern.
    • Reclaimed Wood: Adds character and sustainability to your project.

    You can also use plywood for the cabinet sides and back panel, as it's more affordable and readily available.

    Gathering Tools and Materials

    Once you've determined the size, style, and materials for your bedside cabinet, you'll need to gather the necessary tools and materials.

    Tools

    • Table saw or circular saw
    • Miter saw
    • Drill/driver
    • Sandpaper (various grits)
    • Clamps
    • Measuring tape
    • Pencil
    • Level
    • Safety glasses
    • Dust mask
    • Ear protection

    Materials

    • Wood for the cabinet sides, top, bottom, and shelves (depending on design)
    • Plywood for the back panel (optional)
    • Hardware for drawer slides, hinges, and handles
    • Wood glue
    • Screws
    • Stain or paint (optional)
    • Polyurethane finish (optional)

    Building the Cabinet

    With your tools and materials ready, you can start constructing your vintage-inspired bedside cabinet. Here are the general steps involved:

    Cutting the Wood

    Begin by cutting the wood to the desired dimensions using your table saw or circular saw. Make sure to cut the pieces accurately and precisely for a clean and well-fitted cabinet.

    Assembling the Cabinet Sides

    Assemble the cabinet sides using wood glue and screws. Clamp the pieces together securely to ensure a tight fit.

    Attaching the Top and Bottom

    Once the sides are assembled, attach the top and bottom pieces using wood glue and screws. Align them carefully to ensure they are level and flush.

    Adding Shelves (Optional)

    If you want to include shelves in your bedside cabinet, cut the shelf pieces to size and install them using brackets or shelf supports.

    Attaching the Back Panel

    For added strength and stability, attach a plywood back panel to the cabinet using wood glue and brads.

    Building Drawers (Optional)

    If you plan to include drawers, construct them using the same techniques as for the main cabinet. Install drawer slides and handles.

    Finishing Touches

    Once the cabinet is assembled, you can add finishing touches to give it a vintage-inspired look.

    Sanding

    Sand the entire cabinet thoroughly using sandpaper of various grits. Start with a coarse grit to remove any rough edges and then gradually progress to finer grits for a smooth finish.

    Staining or Painting

    Apply a stain or paint to the cabinet to achieve the desired color and finish. Choose a color that complements the style of your bedroom.

    Applying Polyurethane Finish (Optional)

    To protect the cabinet and enhance its durability, apply a polyurethane finish. This will create a smooth, protective layer and make the cabinet easier to clean.

    Adding Hardware

    Install the hinges, handles, and other hardware to complete your bedside cabinet. Choose hardware that complements the vintage style of the cabinet.

    Tips for a Vintage Look

    To enhance the vintage look of your bedside cabinet, consider these tips:

    • Use distressed wood or create a distressed finish by sanding and applying a dark stain.
    • Choose hardware with antique or vintage-inspired details.
    • Add a touch of patina by using a metal polish or a black patina solution on hardware.
    • Incorporate elements like ornate trim or decorative molding to enhance the vintage aesthetic.

    Building a vintage-inspired bedside cabinet is a rewarding project that allows you to create a unique and functional piece for your bedroom. By following these steps and incorporating your personal style, you can design a cabinet that complements your decor and adds a touch of vintage charm to your space.

    Building a Squirrel Den Box in 5 Simple Steps

    Building a Squirrel Den Box in 5 Simple Steps

    Building a Squirrel Den Box in 5 Simple Steps

    Squirrels are fascinating creatures that add a touch of whimsy to our backyards. Watching them scamper and play is a joy, and you can attract them to your space by providing a safe and cozy den. Building a squirrel den box is a rewarding project that can be completed by anyone with basic carpentry skills. This guide will walk you through the process in 5 simple steps, ensuring your furry friends have a comfortable and secure home.

    Step 1: Gather Your Materials

    Before you start building, make sure you have all the necessary materials on hand. This will streamline the process and ensure you don't have to stop mid-project to run to the store.

    Materials:

    • 1x6 pine boards (5-6 pieces, depending on the size of your box)
    • 1x2 pine boards (4 pieces for framing the entrance)
    • Exterior wood screws
    • Wood glue
    • Waterproof sealant (optional)
    • Heavy-duty wire mesh (for the entrance)
    • Drill
    • Saw (hand saw, circular saw, or jigsaw)
    • Measuring tape
    • Pencil
    • Level
    • Hammer (optional)

    Step 2: Create the Box Framework

    The first step in building your squirrel den box is to create the framework. This will form the base and walls of the structure. Using your 1x6 pine boards, cut two pieces to the length you desire for the front and back panels of the box. Then, cut two more pieces to the width you want for the sides. Assemble these pieces using wood glue and screws, forming a rectangular box shape. Make sure the joints are tight and secure for lasting strength.

    Step 3: Construct the Roof

    Once the framework is complete, it's time to build the roof. Using the remaining 1x6 boards, cut two pieces that are slightly wider than the front and back panels of the box. These will form the sloping roof sections. Cut a third piece to the same width as the side panels, and this will serve as the base of the roof. Attach the two sloping roof pieces to the base piece using glue and screws, creating a triangular shape. Then, attach this roof assembly to the top of the box framework. Be sure to angle the roof slightly to prevent water from pooling on top.

    Step 4: Create the Entrance

    Now it's time to give your squirrels a way to enter their new home. Using the 1x2 boards, construct a frame for the entrance hole. This frame should be slightly smaller than the size of the entrance you want. Cut a piece of heavy-duty wire mesh to fit within the frame, and attach it to the frame using screws or staples. This wire mesh will prevent squirrels from chewing through the entrance and will also help keep predators out. Secure this entrance frame to the front panel of the box, ensuring it is positioned at a height suitable for squirrels to access easily.

    Step 5: Final Touches

    Your squirrel den box is almost ready for its furry inhabitants! To add a finishing touch, consider applying a waterproof sealant to the exterior of the box. This will help protect the wood from the elements and extend its lifespan. You can also stain or paint the box to blend in with your surroundings or to give it a unique look. Lastly, find a suitable location for your den box in your yard. Choose a shaded spot that is out of direct sunlight and wind. Make sure it is at least 6 feet off the ground, ideally on a tree trunk or a sturdy post, to prevent predators from reaching it.

    With a little time and effort, you can create a wonderful haven for your local squirrel population. Your homemade den box will provide them with a secure and comfortable place to rest, raise their young, and enjoy their surroundings. Enjoy watching them use their new home and appreciate the wildlife that enriches your backyard!

    Building a Squirrel Den Box in 5 Simple Steps

    Building a Squirrel Den Box in 5 Simple Steps

    Building a Squirrel Den Box in 5 Simple Steps

    Squirrels are fascinating creatures that add a touch of whimsy to our backyards. Watching them scamper and play is a joy, and you can attract them to your space by providing a safe and cozy den. Building a squirrel den box is a rewarding project that can be completed by anyone with basic carpentry skills. This guide will walk you through the process in 5 simple steps, ensuring your furry friends have a comfortable and secure home.

    Step 1: Gather Your Materials

    Before you start building, make sure you have all the necessary materials on hand. This will streamline the process and ensure you don't have to stop mid-project to run to the store.

    Materials:

    • 1x6 pine boards (5-6 pieces, depending on the size of your box)
    • 1x2 pine boards (4 pieces for framing the entrance)
    • Exterior wood screws
    • Wood glue
    • Waterproof sealant (optional)
    • Heavy-duty wire mesh (for the entrance)
    • Drill
    • Saw (hand saw, circular saw, or jigsaw)
    • Measuring tape
    • Pencil
    • Level
    • Hammer (optional)

    Step 2: Create the Box Framework

    The first step in building your squirrel den box is to create the framework. This will form the base and walls of the structure. Using your 1x6 pine boards, cut two pieces to the length you desire for the front and back panels of the box. Then, cut two more pieces to the width you want for the sides. Assemble these pieces using wood glue and screws, forming a rectangular box shape. Make sure the joints are tight and secure for lasting strength.

    Step 3: Construct the Roof

    Once the framework is complete, it's time to build the roof. Using the remaining 1x6 boards, cut two pieces that are slightly wider than the front and back panels of the box. These will form the sloping roof sections. Cut a third piece to the same width as the side panels, and this will serve as the base of the roof. Attach the two sloping roof pieces to the base piece using glue and screws, creating a triangular shape. Then, attach this roof assembly to the top of the box framework. Be sure to angle the roof slightly to prevent water from pooling on top.

    Step 4: Create the Entrance

    Now it's time to give your squirrels a way to enter their new home. Using the 1x2 boards, construct a frame for the entrance hole. This frame should be slightly smaller than the size of the entrance you want. Cut a piece of heavy-duty wire mesh to fit within the frame, and attach it to the frame using screws or staples. This wire mesh will prevent squirrels from chewing through the entrance and will also help keep predators out. Secure this entrance frame to the front panel of the box, ensuring it is positioned at a height suitable for squirrels to access easily.

    Step 5: Final Touches

    Your squirrel den box is almost ready for its furry inhabitants! To add a finishing touch, consider applying a waterproof sealant to the exterior of the box. This will help protect the wood from the elements and extend its lifespan. You can also stain or paint the box to blend in with your surroundings or to give it a unique look. Lastly, find a suitable location for your den box in your yard. Choose a shaded spot that is out of direct sunlight and wind. Make sure it is at least 6 feet off the ground, ideally on a tree trunk or a sturdy post, to prevent predators from reaching it.

    With a little time and effort, you can create a wonderful haven for your local squirrel population. Your homemade den box will provide them with a secure and comfortable place to rest, raise their young, and enjoy their surroundings. Enjoy watching them use their new home and appreciate the wildlife that enriches your backyard!

    Building a Squirrel Box for Beginners: Free Plans

    Building a Squirrel Box for Beginners: Free Plans

    Building a Squirrel Box for Beginners: Free Plans

    Adding a squirrel box to your backyard is a delightful way to attract these playful and intelligent creatures. Providing a safe and comfortable habitat for squirrels can enhance the biodiversity of your garden and offer hours of enjoyable observation. This guide offers beginner-friendly plans, step-by-step instructions, and essential tips for building a squirrel box that will become a welcome haven for your local squirrel population.

    Materials You’ll Need

    Before embarking on your building project, gather the following materials:

    • Wood: Select a weather-resistant wood, such as cedar, redwood, or pressure-treated pine. Aim for boards that are 1x6 inches or 1x8 inches in dimension. You will need approximately 10-12 feet of lumber.
    • Screws: Choose exterior-grade screws, ideally galvanized or stainless steel, in a variety of lengths.
    • Wood glue: Use a high-quality wood glue for strong and durable bonds.
    • Paint or stain (optional): For added protection and aesthetic appeal, you can paint or stain the exterior of the squirrel box.
    • Metal roofing flashing: This will be used to create a weatherproof roof overhang.
    • Brackets or hooks (optional): For attaching a feeder to the front of the box.

    Tools You’ll Need

    To ensure a smooth construction process, gather the following tools:

    • Saw: A circular saw, miter saw, or handsaw for cutting the wood to size.
    • Drill: A cordless drill with a variety of drill bits is essential for drilling pilot holes and attaching screws.
    • Screwdriver: A manual screwdriver or a cordless drill with a screwdriver attachment will come in handy.
    • Measuring tape: For precise measurements during the construction process.
    • Level: To ensure that the box is level and stable.
    • Clamps: To hold pieces together while gluing and securing.
    • Hammer: For hammering in nails (optional) and for general use.
    • Pencil: For marking cutting lines and assembling the box.
    • Safety Glasses: Protect your eyes from flying debris during cutting and sanding.

    Step-by-Step Instructions

    Step 1: Cutting the Wood

    Begin by cutting the wood according to the dimensions outlined in the plans. The typical size for a squirrel box is around 12 inches wide, 12 inches deep, and 18 inches high. However, feel free to adjust these dimensions to fit your specific preferences.

    • Front and Back Panels: Cut two pieces of wood to 12 inches wide and 18 inches high.
    • Side Panels: Cut two pieces of wood to 12 inches wide and 12 inches high.
    • Bottom Panel: Cut one piece of wood to 12 inches wide and 12 inches deep.
    • Roof Panels: Cut two pieces of wood to 12 inches wide and 18 inches high.

    Step 2: Constructing the Box

    Assemble the box using wood glue and screws. First, attach the side panels to the front and back panels, ensuring that the bottom edge of the side panels aligns with the bottom edge of the front and back panels. Secure the joints with screws and glue.

    Once the side panels are attached, place the bottom panel into the box and secure it to the bottom edge of the side panels using glue and screws.

    Step 3: Creating the Roof

    For the roof, attach the two roof panels to the top of the box. You can use a variety of methods to attach the roof, including hinges or simply attaching them securely with screws and glue.

    For a more durable roof, you can create a small overhang to protect the interior from rain. To do this, cut a strip of metal roofing flashing to the width of the box and attach it to the front and back edges of the roof. This will create a slight overhang that will channel rainwater away from the entrance hole.

    Step 4: Creating the Entrance Hole

    Using a saw, carefully cut a 4-inch diameter hole near the top of the front panel. The entrance hole should be high enough to accommodate squirrels comfortably while discouraging larger animals from entering.

    Step 5: Finishing Touches

    Apply paint or stain to the exterior of the box for added protection and visual appeal. Be sure to let the paint or stain dry completely before installing the box.

    Consider adding brackets or hooks to the front of the box for attaching a feeder. This will give squirrels a convenient source of food and will make it easier to replenish their food supply.

    Choosing the Right Location

    Finding the ideal location for your squirrel box is crucial for its success. Consider the following factors:

    • Tree Cover: Squirrels feel safest when they have access to trees or bushes for quick escape routes. Choose a location near a tree, particularly one with a thick canopy.
    • Height: Mount the box 8-10 feet above the ground to deter predators.
    • Protection: Install the box away from direct sunlight and heavy rainfall, ensuring it has some natural shelter from the elements.
    • Visibility: Choose a location where you can easily observe the squirrels, providing a delightful view of their activity.

    Installing the Squirrel Box

    Once you’ve found the perfect spot, you can secure the box to a tree using sturdy brackets or hooks. Use galvanized or stainless steel screws or bolts to ensure long-lasting attachment. Ensure the box is level and stable.

    Maintaining Your Squirrel Box

    Regular maintenance will keep your squirrel box in top condition and ensure its attractiveness to squirrels. Here are some tips:

    • Clean the box: Twice a year, remove any accumulated debris or nesting materials. Use a gentle cleaning solution and allow the box to air dry completely before re-installing it.
    • Inspect for damage: Regularly check for any damage to the box, such as broken wood, loose screws, or wear and tear. Repair any damage promptly to maintain the structural integrity of the box.
    • Replace bedding: Replace the nesting material in the box with fresh, dry materials as needed.

    Conclusion

    By following these detailed plans and guidelines, you can confidently build a squirrel box that will provide a safe and comfortable haven for these charming creatures. Enjoy watching squirrels make their home in your backyard, and marvel at their agility and intelligence.

    Designing the Perfect Cold Frame for Your Garden

    Designing the Perfect Cold Frame for Your Garden

    Designing the Perfect Cold Frame for Your Garden

    Extend your gardening season and give your plants a head start with a well-designed cold frame. These simple structures act as mini-greenhouses, providing a protected environment for seedlings, starting seeds, and even overwintering delicate plants. Whether you're a seasoned gardener or just starting out, building a cold frame is a rewarding project that will benefit your garden for years to come.

    Choosing the Right Location and Size

    Before you start building, consider the best location for your cold frame. Choose a spot that receives plenty of sunlight, ideally facing south for maximum warmth. Also, ensure the location is easily accessible for watering and tending to your plants. The size of your cold frame will depend on your needs. If you plan on starting many seedlings, consider building a larger frame. For smaller needs, a smaller cold frame might be ideal.

    Materials and Construction

    Cold frames can be built using a variety of materials, offering different levels of cost and durability. Here are some popular options:

    Wood

    Wood is a traditional choice for cold frames, providing a sturdy and aesthetically pleasing structure. Select rot-resistant woods like cedar or redwood for longevity. You can use pre-cut lumber or build the frame from scratch using simple joinery techniques.

    Recycled Materials

    Get creative and repurpose materials for your cold frame. Old windows, pallets, or even bricks can be incorporated into your design. This option is eco-friendly and can save you money.

    Metal

    For a more durable and long-lasting cold frame, consider using metal framing. Metal frames are also resistant to weather damage and can be easily assembled.

    Key Design Features

    To maximize your cold frame's effectiveness, consider these important design elements:

    • Sash or Lid: This removable cover allows you to control airflow and temperature. Use glass, polycarbonate, or even acrylic for the sash material. For added insulation, consider adding a layer of bubble wrap beneath the sash.
    • Ventilation: Incorporate vents or openings in the sash or frame to regulate temperature and prevent condensation buildup. These vents should be adjustable to allow for air circulation when needed.
    • Base and Insulation: The base of your cold frame should be raised slightly off the ground to improve drainage and allow for airflow. To insulate the base and further protect your plants, consider adding layers of straw, leaves, or other organic materials.

    Getting Started with Your Cold Frame

    Once your cold frame is built, prepare the soil inside. Use a well-draining potting mix or garden soil amended with compost. You can also incorporate peat moss or other organic materials to improve soil texture and water retention.

    Now, you're ready to start growing! Sow seeds directly in the cold frame or transplant seedlings that have been started indoors. Water your plants regularly, keeping the soil consistently moist. Remember to monitor temperature and ventilation, making adjustments as needed to ensure optimal growing conditions.

    Building a cold frame is a simple and rewarding project that will extend your gardening season and help you produce healthier and more abundant crops. With a little planning and ingenuity, you can design the perfect cold frame to suit your specific needs and gardening style.

    How to build a grill gazebo with a screened-in patio

    How to build a grill gazebo with a screened-in patio

    Building a Grill Gazebo with a Screened-In Patio: A Step-by-Step Guide

    Imagine yourself enjoying a delicious barbecue with friends and family, protected from the elements and pesky insects. This dream can become a reality with a well-designed grill gazebo that seamlessly integrates with a screened-in patio. This comprehensive guide provides a step-by-step walkthrough, enabling you to build this ultimate outdoor oasis.

    Planning Your Dream Outdoor Space

    Before you start swinging a hammer, carefully plan your project. Determine the size and layout of your gazebo and patio, taking into account existing structures and landscaping. Consider the following:

    Size and Shape

    The size of your gazebo should accommodate your grill, seating, and any additional features you envision. A square or rectangular shape is typically easiest to construct, but you can explore other designs like octagons or even curved structures for a more unique look.

    Location and Orientation

    Choose a location that maximizes shade and minimizes wind. Ideally, place your gazebo where you have access to electricity and plumbing for future additions like a mini-fridge or outdoor kitchen sink. Consider the sun's path and orient the patio for optimal sunlight exposure.

    Materials and Budget

    Decide on materials that align with your budget and desired aesthetic. Wood, metal, and vinyl are popular choices for framing, while canvas or vinyl are common for roofing and screening. Research different options and compare prices to find the best value for your needs.

    Foundation and Framing: Laying the Groundwork

    The foundation is the backbone of your structure. Choose a foundation type based on soil conditions and local building codes. Here are two common options:

    Concrete Footings

    Concrete footings provide a stable and long-lasting base. Excavate holes for the footings, pour concrete, and allow it to cure completely. Attach the framing to the footings using anchor bolts.

    Pressure-Treated Wood Posts

    For less demanding soil conditions, pressure-treated wood posts can suffice. Set the posts in concrete, ensuring they are level and plumb. Attach the framing to the posts using lag screws or other appropriate fasteners.

    Once the foundation is set, erect the framing for your gazebo. Use strong, weather-resistant lumber, following your chosen design plans. Ensure the framing is square and secure. This will provide a solid foundation for your roof and screening.

    Roofing: Sheltering Your Oasis

    The roof is the defining element of your gazebo, protecting you from the elements. Choose a roofing material that suits your style and budget:

    Canvas

    Canvas is a classic choice for gazebos, providing a lightweight and breathable option. It comes in various colors and can be easily replaced when needed. Consider using a water-resistant sealant for added protection.

    Vinyl

    Vinyl is a durable and low-maintenance choice for roofing. It's resistant to water, mold, and mildew. Choose a vinyl color that complements your overall design.

    Metal

    Metal roofing offers exceptional durability and longevity. It's available in various styles and colors. Consider using a metal roof if you want a modern and sleek look.

    Once you've chosen your roofing material, install it according to the manufacturer's instructions. Secure the roofing to the framing, ensuring it's watertight and properly ventilated. Consider adding a gutter system to collect rainwater.

    Screening: Creating Your Insect-Free Haven

    Screened-in patios offer the perfect balance between outdoor living and protection from pesky insects. Choose a screening material that is durable and allows for good airflow.

    Fiberglass Screening

    Fiberglass screening is a popular choice due to its affordability and durability. It's resistant to tearing and fading, offering good visibility and airflow.

    Polyester Screening

    Polyester screening is a more premium option, known for its strength and resistance to tearing. It often comes in a variety of colors, adding a stylish touch to your patio.

    Install the screening using staples, tack strips, or specialized screening clips. Ensure the screening is tight and secure, preventing insects from finding their way in. Consider adding a door or gate to allow for easy access to the patio.

    Finishing Touches: Making it Your Own

    Now that the main structure is complete, it's time to add the finishing touches that make your grill gazebo truly special. Consider the following:

    Lighting

    Install lighting to illuminate your patio for evening gatherings. Choose from string lights, solar lights, or recessed lighting for a more sophisticated look. Consider adding a dimmer switch for adjustable brightness.

    Decor

    Add personal touches with outdoor furniture, plants, and decorative accents. Use comfortable seating, a coffee table, and a small rug to create a cozy atmosphere. Plant flowering vines or hanging baskets to add a touch of greenery.

    Grill Integration

    Ensure your grill is safely and conveniently located within the gazebo. Consider adding a side table for grilling tools, a storage area for propane tanks, and a drip pan to catch grease. Ensure the grill is properly vented to prevent smoke buildup.

    Safety and Maintenance

    Regular maintenance ensures your grill gazebo and screened-in patio remain in optimal condition. Inspect the structure for any signs of wear or damage, tighten loose screws or fasteners, and clean the roof and screens regularly.

    By following these steps, you can build a stunning grill gazebo with a screened-in patio that transforms your outdoor space into an inviting haven for entertaining and relaxation. Remember, it's a project that requires careful planning, attention to detail, and a touch of creativity. Enjoy the process of creating your own custom oasis, where you can gather with loved ones and make unforgettable memories under the stars.

    Diy woodworking magic box with hidden compartments

    Diy woodworking magic box with hidden compartments

    Crafting a Magical Wooden Box with Secret Compartments

    Imagine a wooden box that appears ordinary at first glance, but upon closer inspection, reveals a world of hidden compartments and secret compartments. This isn't just a box; it's a treasure chest of possibilities, waiting to be unlocked. Let's embark on a journey to build your very own magic box, a piece of woodworking artistry that will leave you and your loved ones in awe.

    Gathering Your Tools and Materials

    Before we dive into the construction, ensure you have the necessary tools and materials. Gather the following:

    • Woodworking tools: A saw, a drill, a hammer, sandpaper, clamps, and a measuring tape are essential.
    • Wood: Choose your desired wood type. Pine is budget-friendly, while hardwoods like cherry or maple provide elegance.
    • Hinges: Opt for sturdy hinges to secure your secret compartments.
    • Fasteners: Screws, nails, or glue will hold your project together.
    • Finishes: Stain, paint, or varnish to enhance the look of your magic box.

    Designing Your Magic Box

    The magic lies in the design. Sketch out your vision. Consider the dimensions, the number of secret compartments, and their placement. Imagine a box with a false bottom, a sliding panel, or even a rotating mechanism. Let your creativity run wild!

    If you're a beginner, start with a simpler design. You can create a box with a hidden drawer, a compartment accessible through a hinged section, or a false bottom. As your woodworking skills grow, you can tackle more complex designs.

    Building the Box: A Step-by-Step Guide

    Once you've settled on your design, it's time to transform your vision into reality. Here's a detailed guide:

    Step 1: Cutting the Wood

    Measure and cut your wood pieces according to your design. Use a saw to accurately create the box's sides, top, bottom, and any internal partitions for your compartments.

    Step 2: Assembling the Base

    Join the sides and bottom of the box using glue and screws or nails. Ensure the joints are strong and secure. Clamp the pieces together for a few hours to allow the glue to set properly.

    Step 3: Building the Secret Compartments

    This is the heart of your magic box. Create the hidden compartments using smaller pieces of wood. For a false bottom, cut a piece of wood that fits snugly inside the box, leaving enough space for a small compartment underneath. For a sliding panel, attach a piece of wood to a groove in the box's side.

    Step 4: Attaching Hinges and Hardware

    Attach hinges to the secret compartments and the main box. Carefully align the hinges to ensure smooth movement. Install any latches, catches, or other hardware needed to secure your compartments.

    Step 5: Finishing Touches

    Sand your box to a smooth finish, removing any rough edges or imperfections. Apply your chosen stain, paint, or varnish, allowing each layer to dry completely. Use a clear coat for added protection.

    Unlocking the Magic: Filling Your Box with Treasures

    With your magic box complete, it's time to fill it with your personal treasures. Perhaps it holds cherished mementos, important documents, or even a secret stash of snacks. The possibilities are endless! You can personalize it further by adding a decorative lock, a unique inscription, or even a special inscription to make it truly your own.

    Your magic box is now a testament to your craftsmanship and a unique piece that will be cherished for years to come. It's not just a box; it's a vessel of secrets, memories, and imagination.